Media Manager Guide
StaticQ's Media Manager is organized as a four-step workflow. Each step builds on the previous one, giving you full control over your media library at every stage.
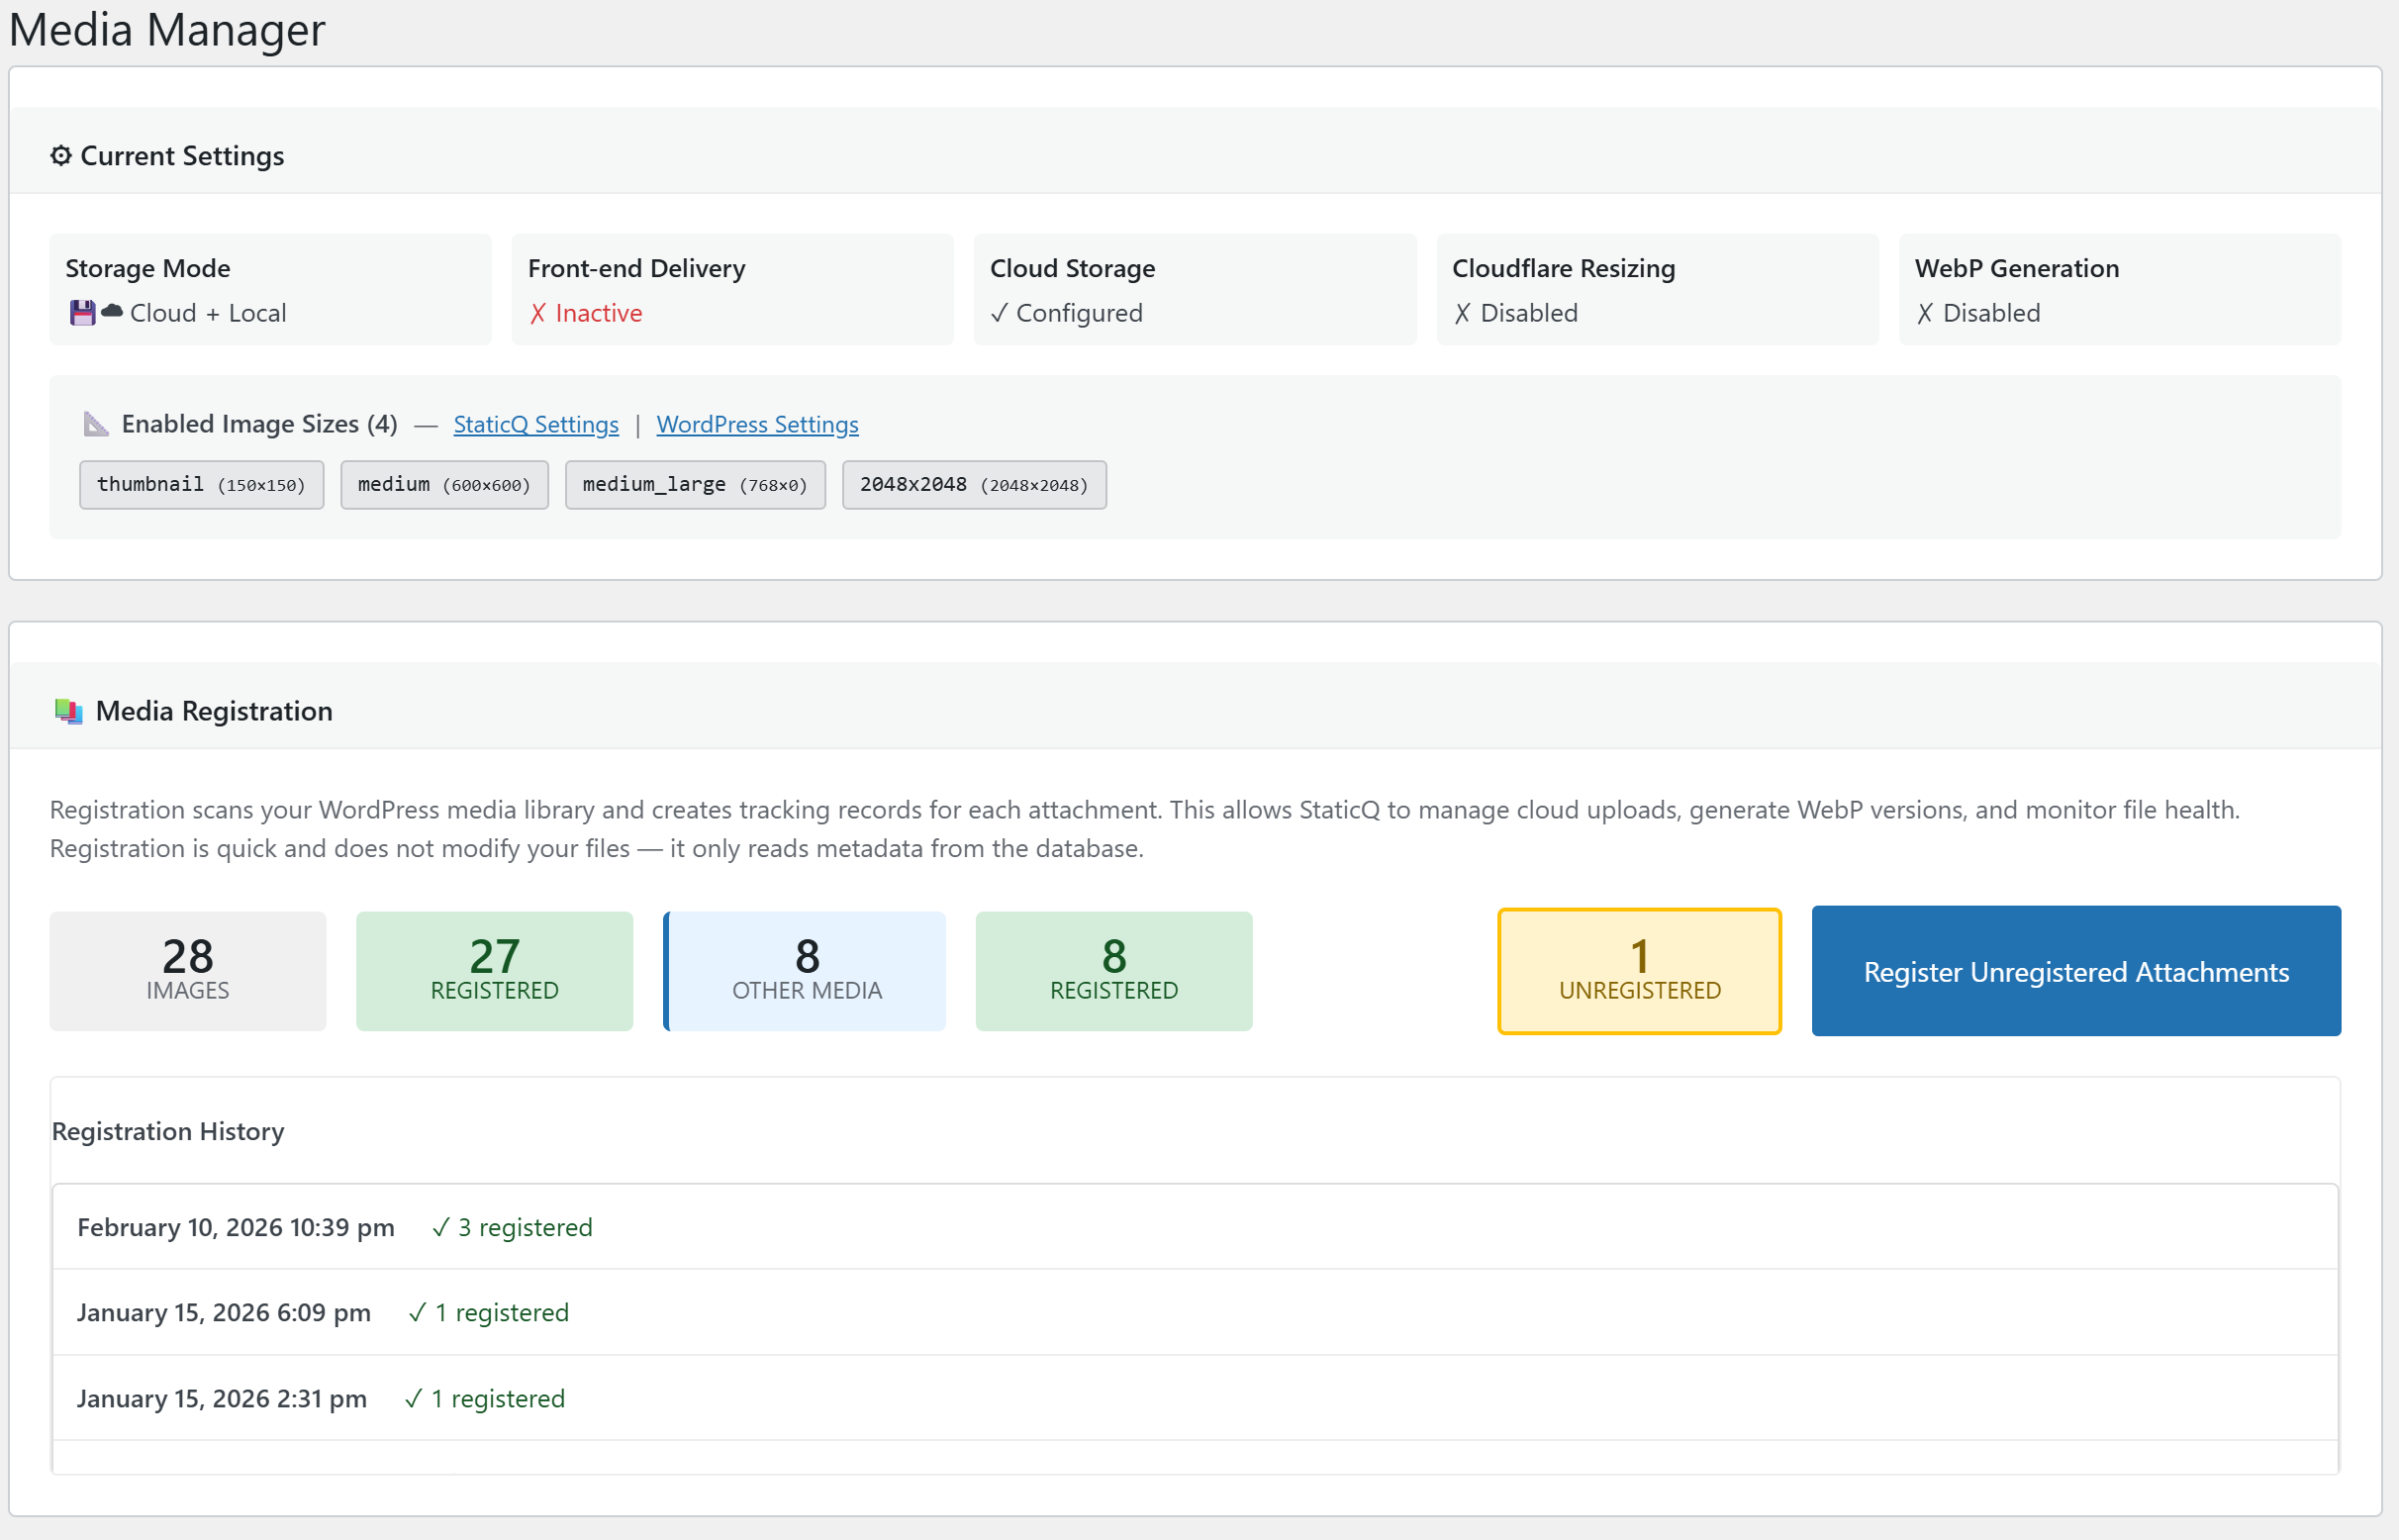
Registration
Before StaticQ can manage your images, it needs to know about them. The Registration tool indexes your existing WordPress media library into StaticQ's own database — a lightweight table that tracks each attachment's processing status.
What registration does
- Creates a record for each attachment in StaticQ's tracking table
- Records the attachment's file path, directory, and scaling information
- Processes attachments in batches — safe for large libraries
Nothing is modified
Registration is a read-only operation as far as your media library is concerned. It does not rename, move, resize, or delete any files. It does not alter your WordPress metadata. Your existing media library continues to work exactly as before.
Registration does not queue attachments for processing or modify them in any way. It simply makes StaticQ aware of your existing images so the Media Library Scanner can later compare them against your current settings and repair any discrepancies.
Why registration matters
Attachments that are not registered in StaticQ will not benefit from its front-end delivery system or its scanners. Only registered images are served with the optimized <picture> tag that provides WebP sources and CDN URLs to your visitors. Registration also enables the Media Library Scanner to check each attachment's metadata and files against your current settings — without it, discrepancies like missing sizes, missing WebP variants, or cloud sync gaps cannot be detected or repaired.
New uploads are registered automatically when upload interception is enabled. The Registration tool is only needed for images that were already in your library before installing StaticQ.
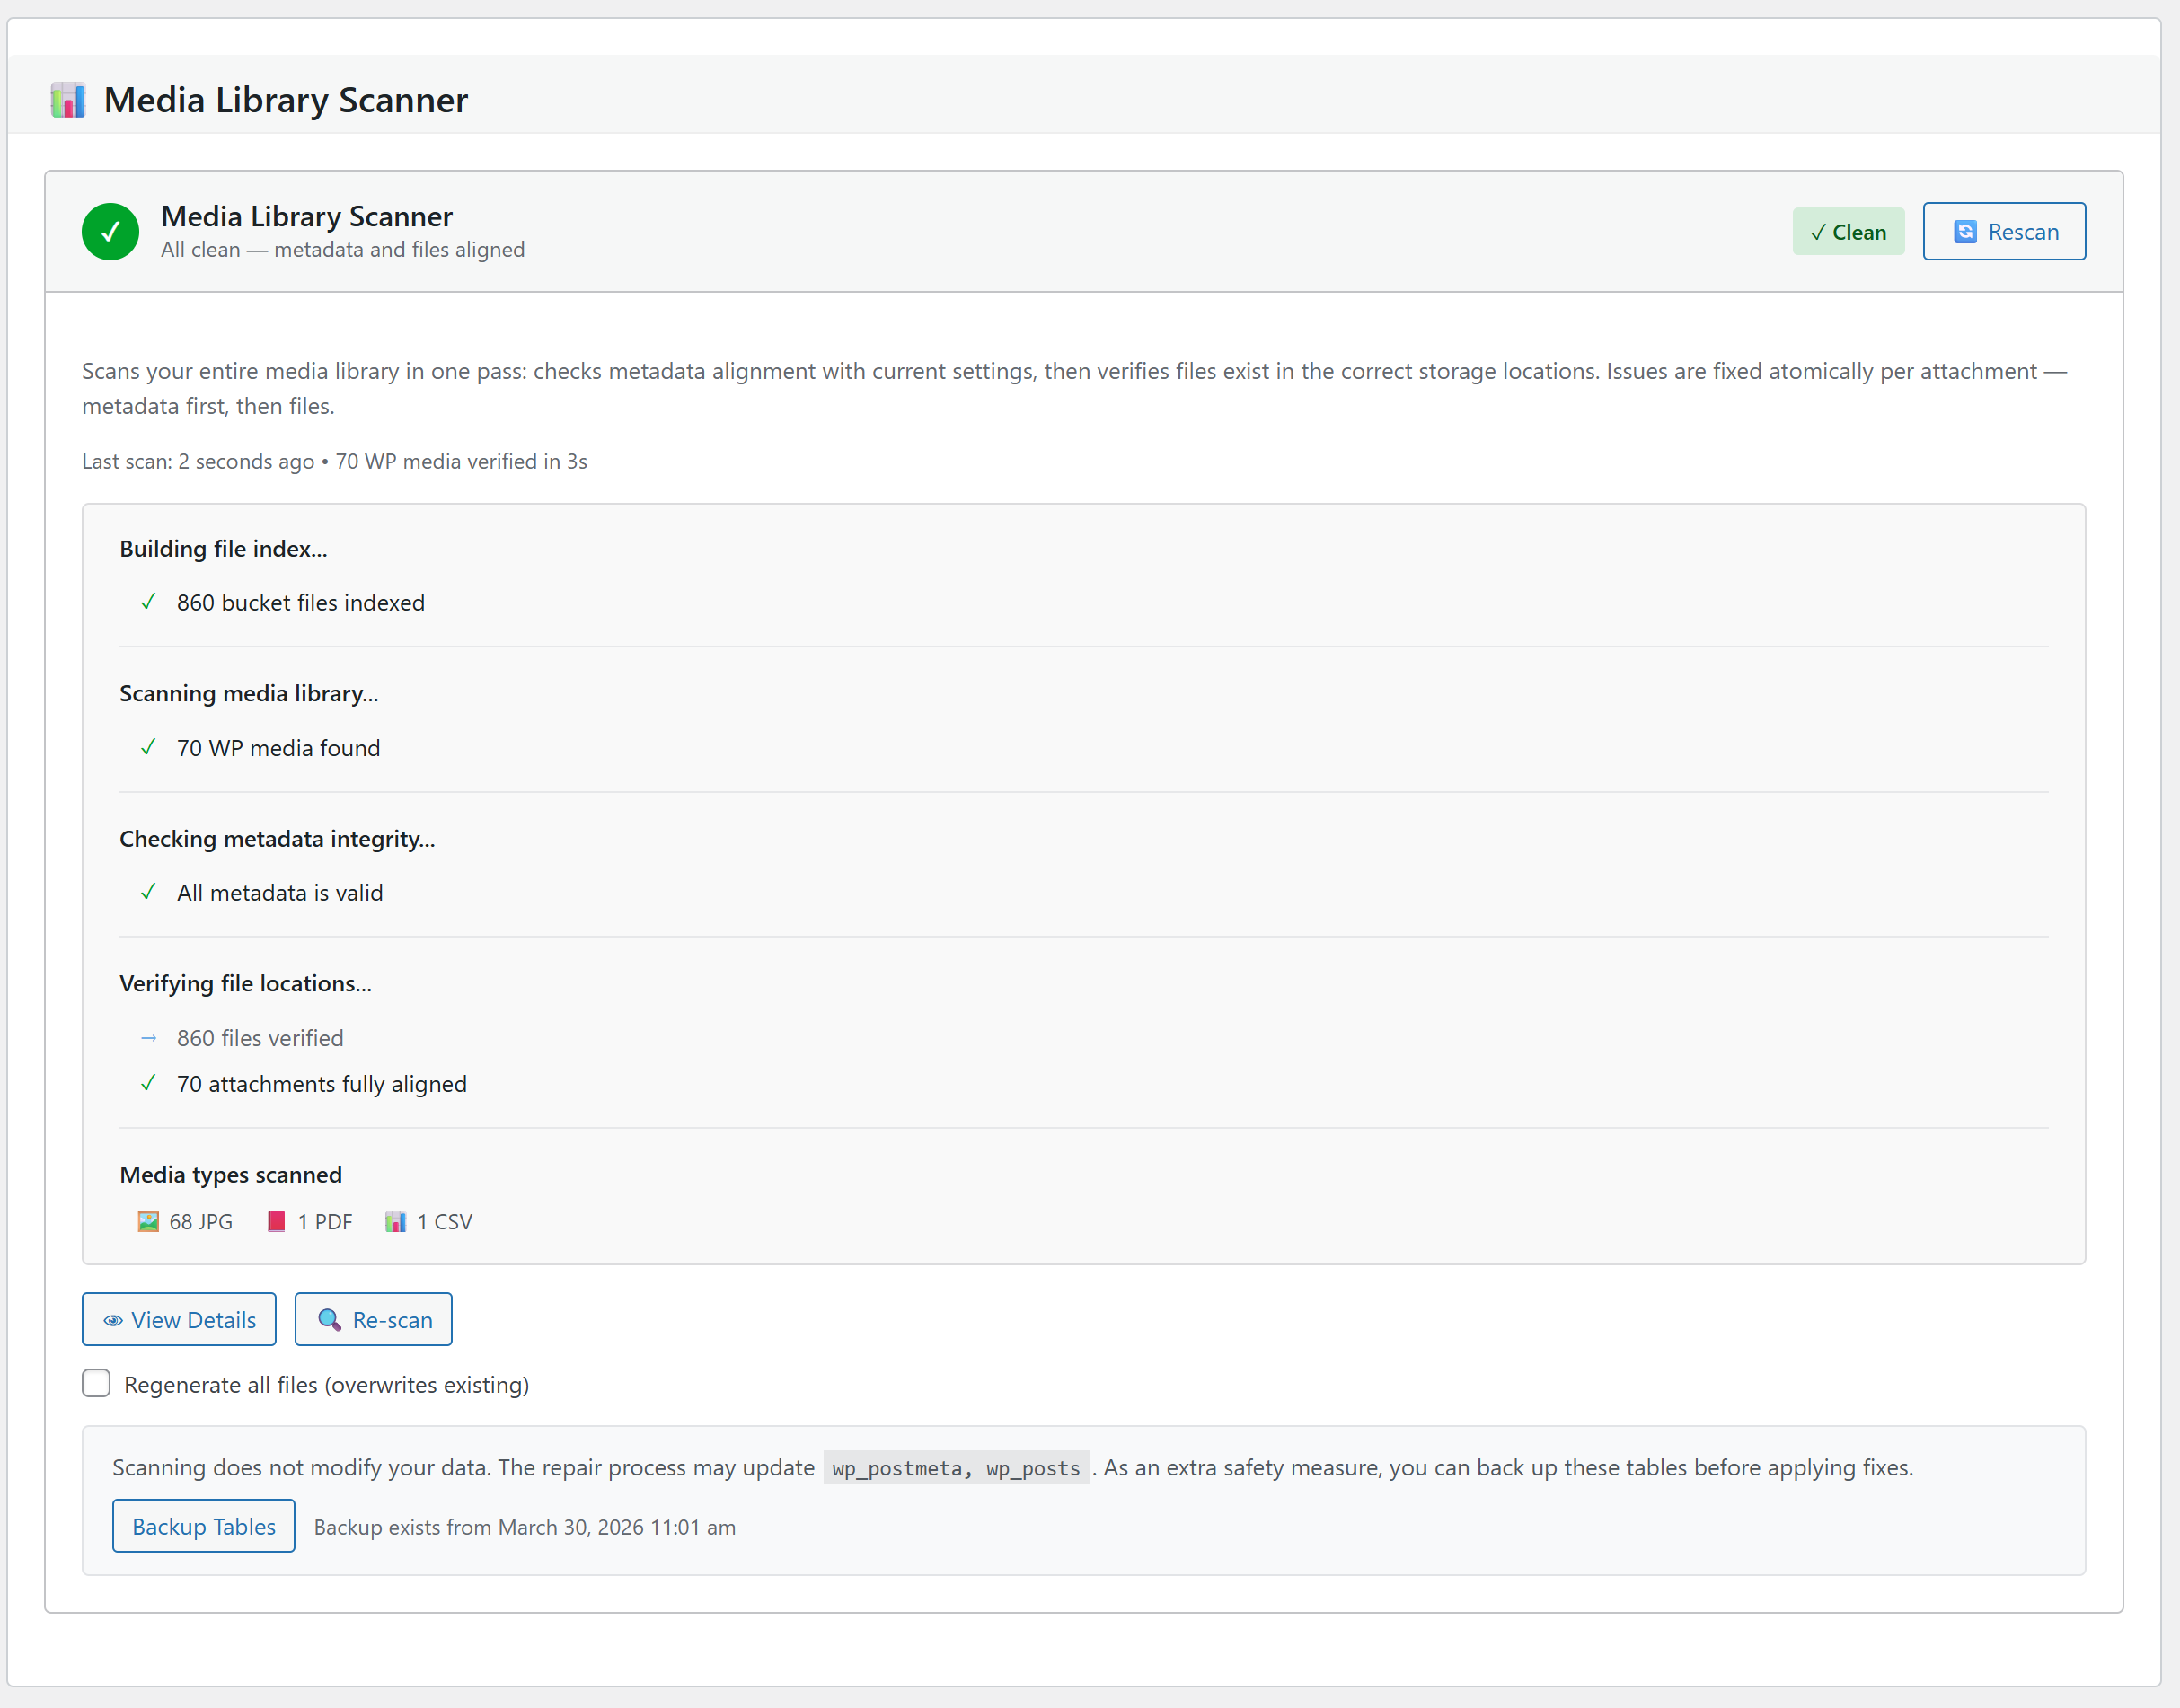
Media Library Scanner
The scanner compares every registered attachment against your current plugin settings. It detects discrepancies between what exists and what should exist, then offers one-click repair for each issue found.
Scanning is completely safe
The scanning phase is a read-only operation. No files are created, modified, or deleted, and no database records are changed. It simply reads your current files and metadata to build a report. Run it as many times as you like — there is zero risk.
One of the hardest parts of managing a WordPress media library is making a clean transition — whether you're switching to a new set of thumbnail sizes, changing themes, or migrating to cloud storage. The Media Library Scanner makes these transitions accessible and safe, giving you a clear picture of exactly what needs to change before anything is touched.
What the scanner checks
Database integrity
Detects missing or corrupted metadata — dimensions, file paths, and size definitions stored in postmeta.
Missing files
Checks for files that should exist locally or in the cloud bucket but are missing from either or both locations.
Thumbnail uniformity
Ensures every attachment has all the image sizes defined in your WordPress settings — perfect for standardizing a library after theme or plugin changes.
WebP generation
Generates WebP variants for any image that doesn't have one yet — via Cloudflare's API or locally using your server's image library.
The scanner also supports overwrite mode, which regenerates files even if they already exist. This is useful when you change your compression quality or switch resizing tools and want the entire library to match the new settings.
What the repair tool does — and doesn't do
What it may change
- Fix corrupted or incomplete
postmetavalues (dimensions, filesize, size definitions) - Generate missing thumbnail files and upload them to cloud storage
- Generate WebP versions for images that don't have them
- Regenerate existing files when running in overwrite mode
- Update image references in
post_contentwhen a file is renamed or replaced by a different size
What it never does
- Delete existing files — old thumbnails are preserved alongside the new ones
- Rename or move your original images
- Modify image content (crop, rotate, etc.)
Safe for live sites
Because the scanner never removes files, pages that still reference obsolete thumbnails will continue to work normally. This makes it safe to run on production sites and allows for a gradual, controlled migration to your new media settings.
Backup recommendation
The repair tool may update rows in the wp_postmeta and wp_posts tables. If you want a quick safety net, export those two tables before running a large repair batch. A simple SQL dump is enough to roll back any changes instantly.
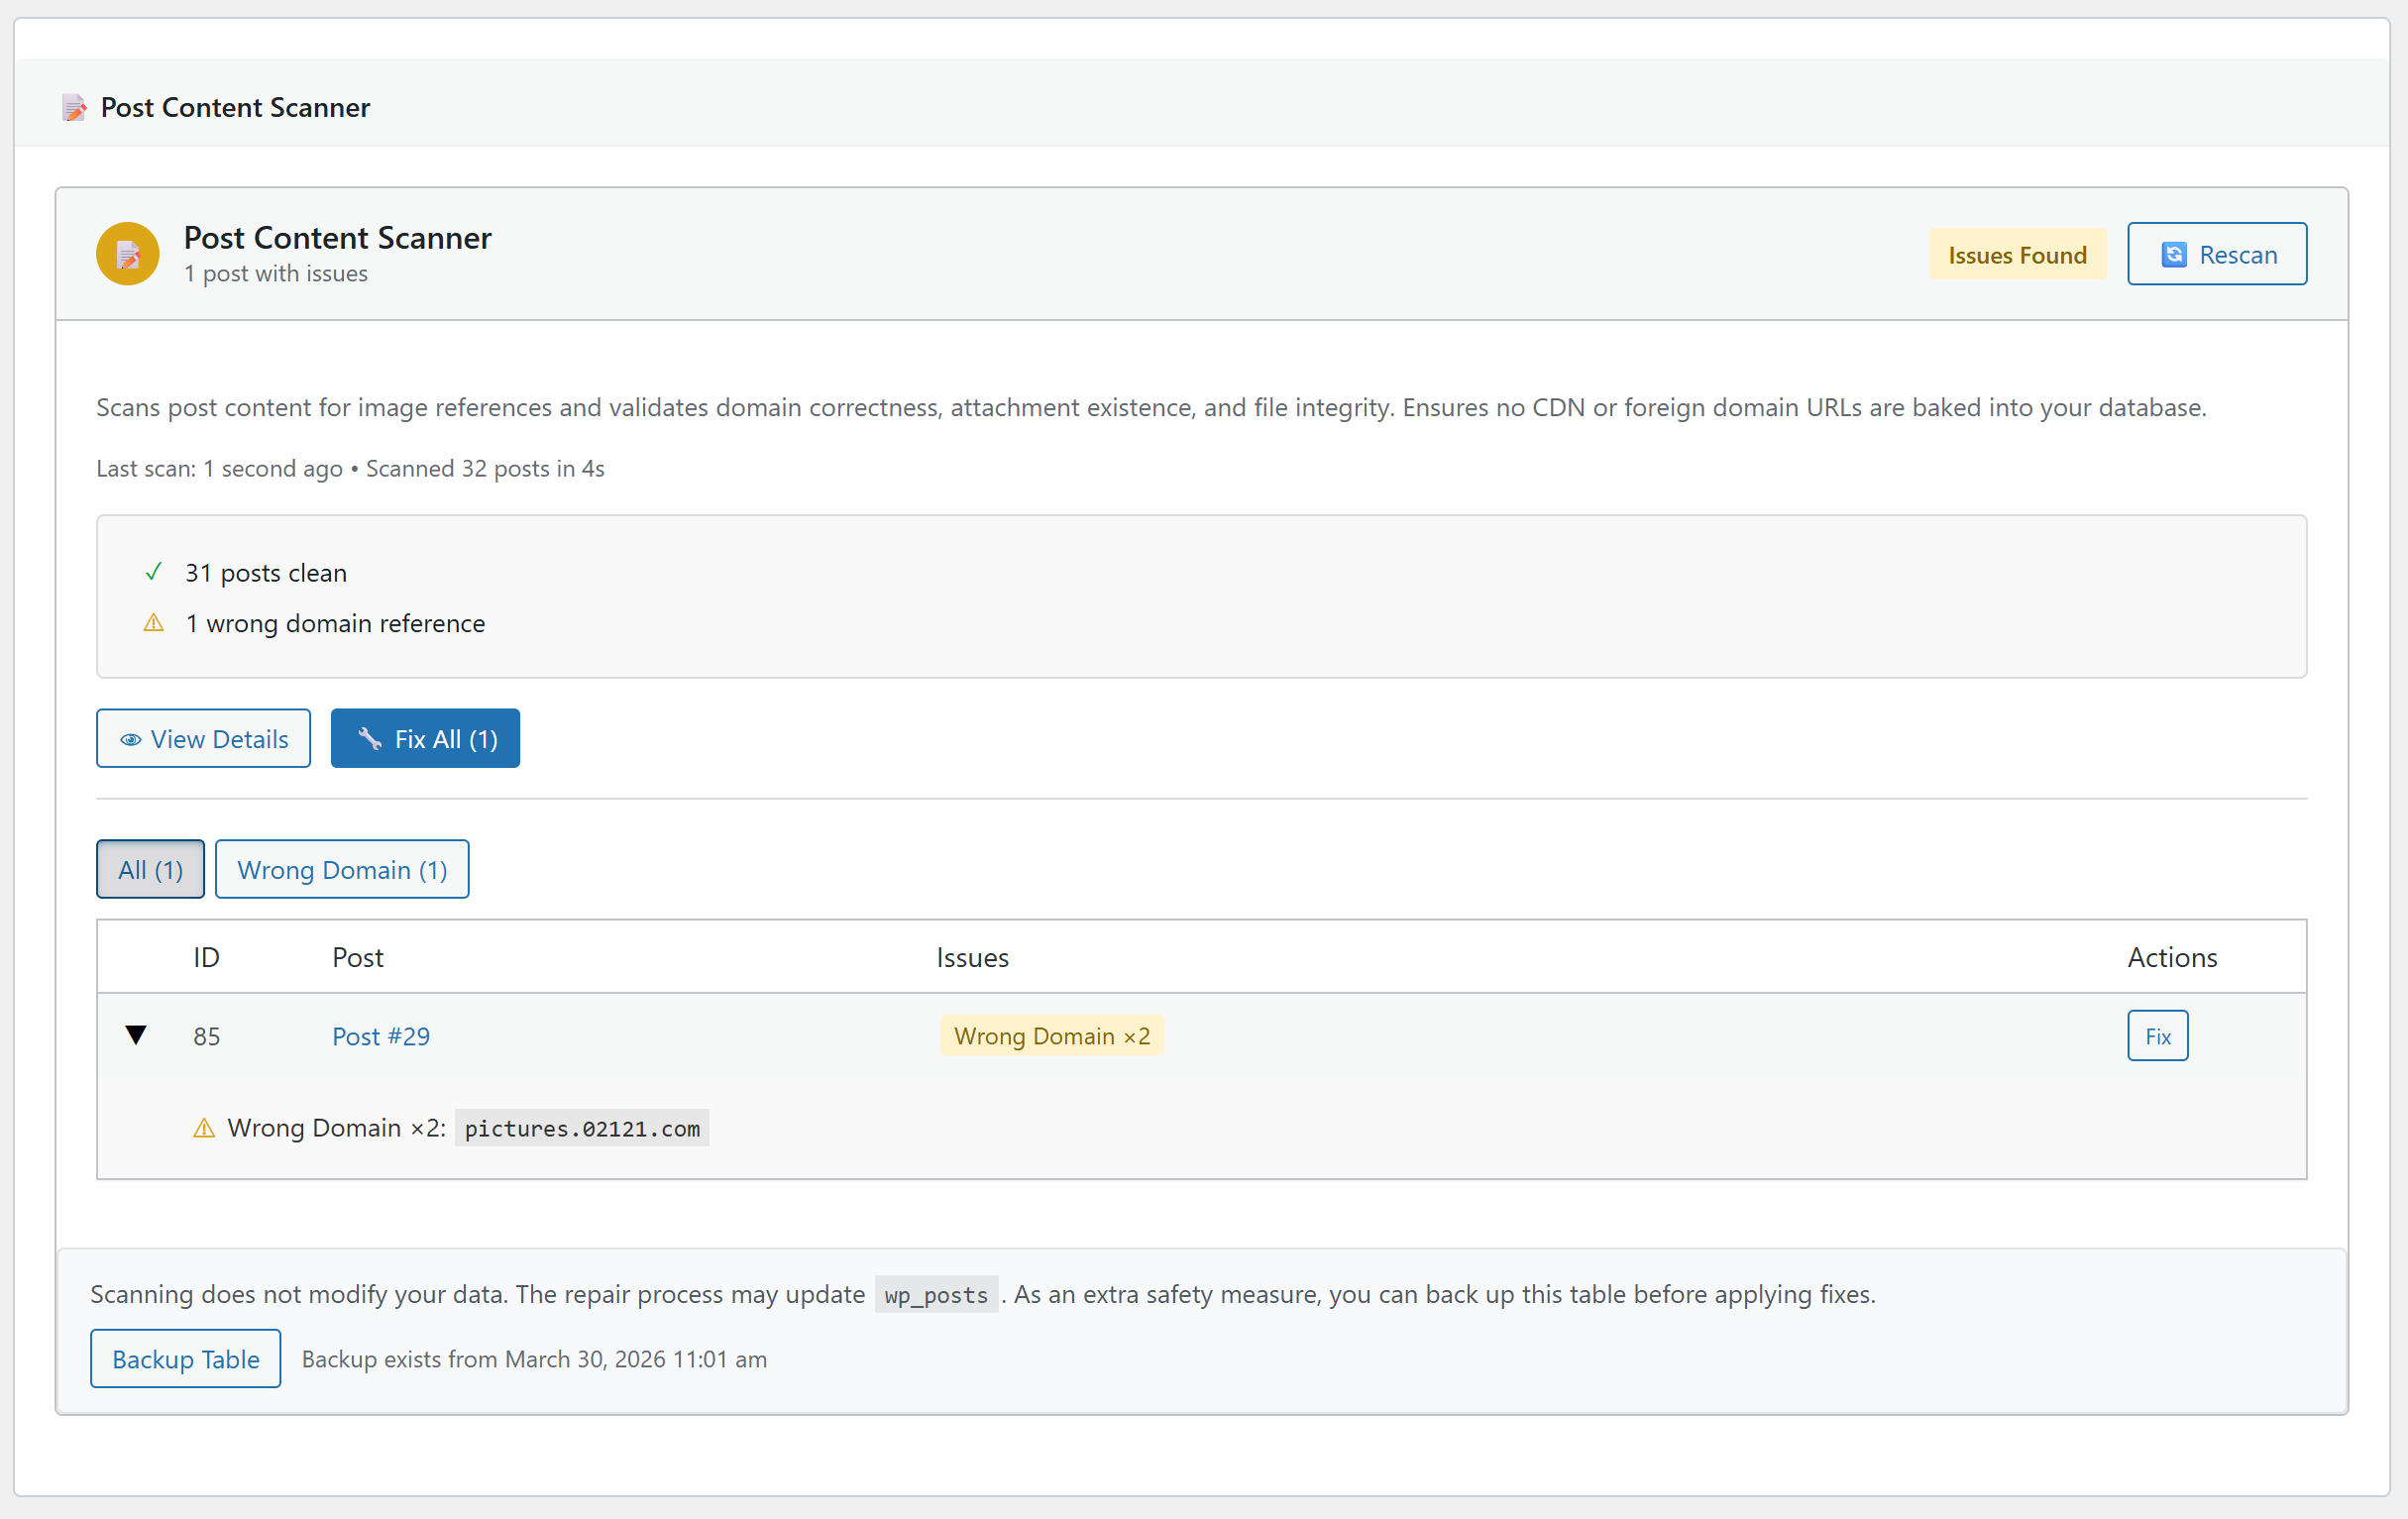
Post Content Scanner
Switched CDN providers, migrated domains, changed image sizes — your post content may still reference old URLs or outdated filenames. The Post Content Scanner inspects every post for stale image references baked into your database.
Scanning is completely safe
The scanning phase is read-only. It inspects your post content without modifying anything. Only the explicit repair action writes changes to your database.
What the scanner detects
Wrong domain URLs
Finds CDN or foreign domain URLs that should point to your local site — common after domain migrations or CDN provider changes.
Stale size references
Detects image filenames that no longer match current attachment metadata — leftover references from changed thumbnail sizes.
Deleted attachments
Flags images linked to attachments that no longer exist in your media library. Reported for manual review.
Broken URLs
Identifies image URLs that cannot be resolved to any attachment in your media library. Reported for manual review.
What the repair tool does — and doesn't do
What it fixes automatically
- Rewrites wrong domain URLs to point to your current site domain
- Updates stale size references to match current attachment metadata
What it reports for manual review
- Deleted attachment references — the original image no longer exists
- Broken URLs — cannot be matched to any attachment record
The scanner inspects all posts, pages, and custom post types regardless of their publication status. Every post is checked, whether or not it contains images.
Table backup
The repair tool writes changes directly to the wp_posts table. A built-in backup button lets you create a copy of the table before applying fixes, so you can roll back instantly if needed.
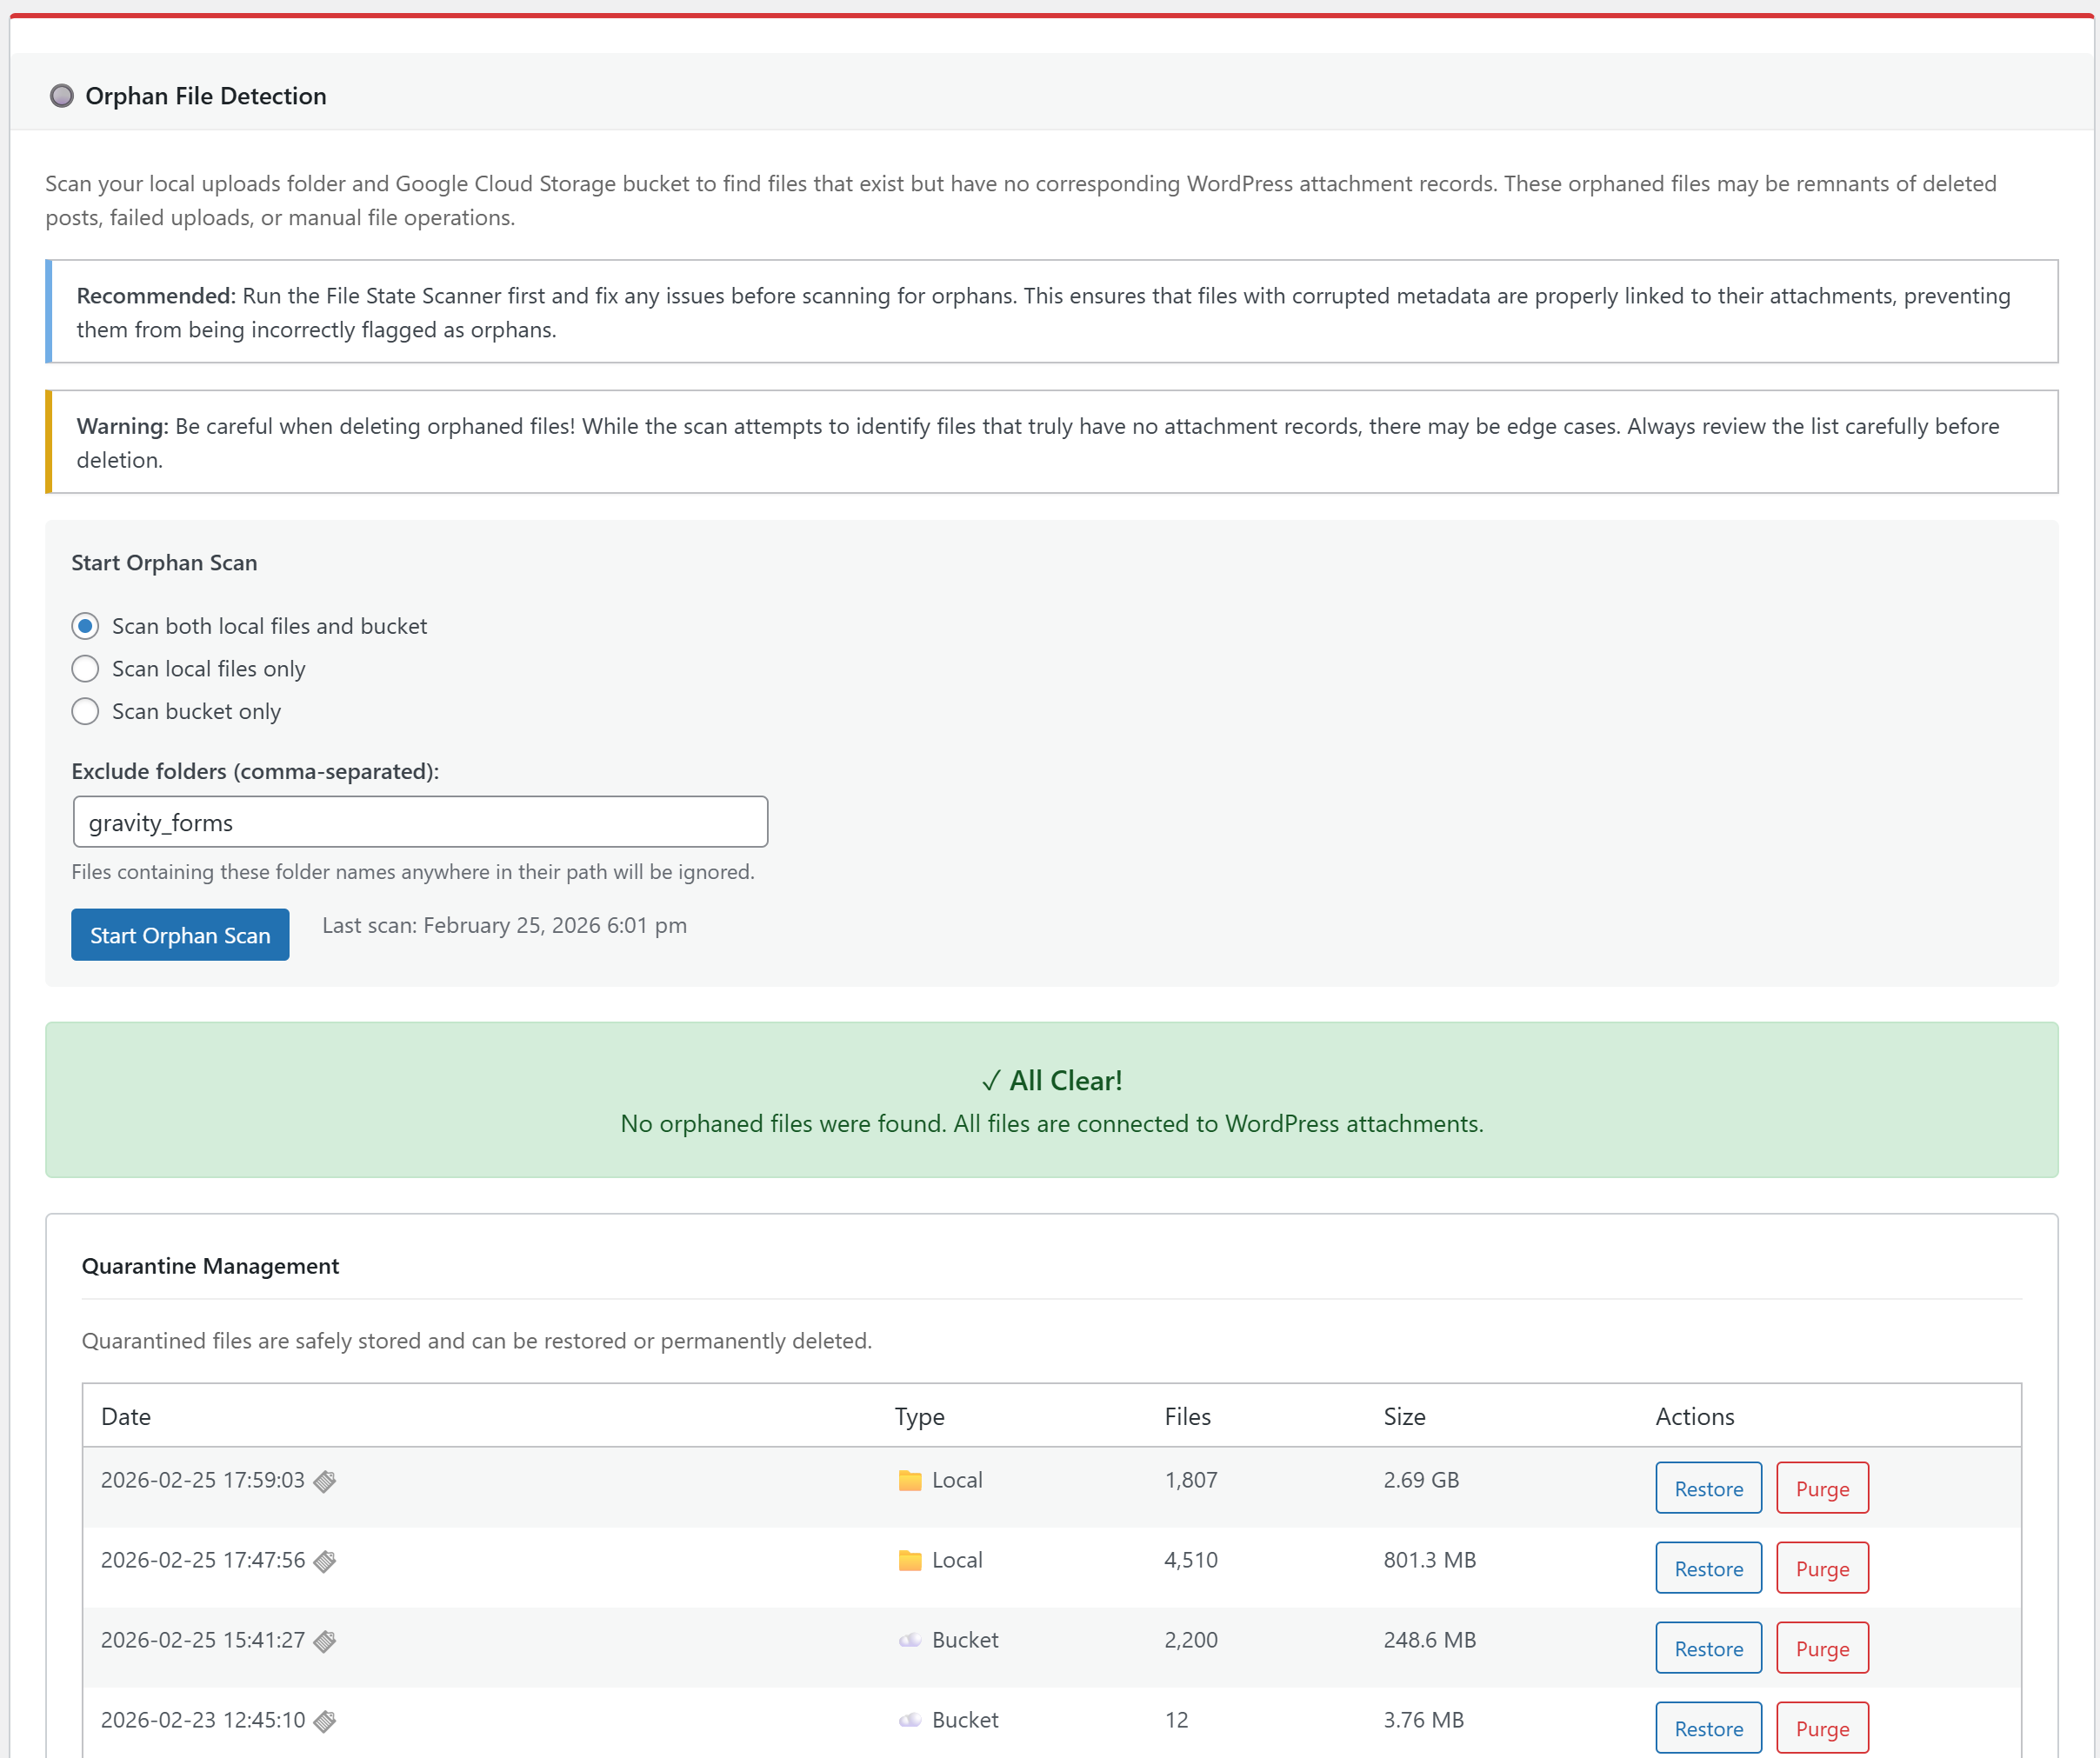
Orphan File Detection
After your library is registered and repaired, the final step is identifying files that no longer belong. The Orphan File Detection tool scans your uploads folder for any file that is not referenced by a WordPress attachment — leftover thumbnails from deleted images, remnants of old plugins, or duplicates created by failed imports.
Handle with care
Some themes and plugins store assets directly in the uploads folder. These files won't have a matching database record and will appear as orphans. Always review the results before taking action.
This step is entirely optional
If you have plenty of disk space and don't mind a few extra files, you can skip orphan detection altogether. In fact, if you tend to experiment with different thumbnail sizes, keeping orphan files can be beneficial — they'll be picked back up automatically if you revert to those sizes in your settings, saving you from regenerating them from scratch.
Recommended workflow
Run an initial scan
Start a scan and let it index your entire uploads folder. The scanner compares every file on disk against the WordPress database and flags anything that has no matching attachment record.
Review the folder tree
At the top of the results, a folder tree shows every directory in your uploads folder and how many orphan files each one contains. Look for folders that belong to plugins or themes rather than the media library — these should be preserved, not cleaned up.
Exclude non-media folders
Add any folder that is not part of the media library to the ignore list. This ensures those files are never flagged as orphans in future scans. Common examples include cache directories, plugin-generated assets, and theme resources.
Quarantine the orphan files
Rather than deleting files immediately, StaticQ moves them to a separate quarantine folder. The files are taken out of your uploads directory but kept on disk. This is your safety net.
Test your site
Browse your website thoroughly. Check pages, posts, and any custom content that displays images. If something looks wrong, the quarantined files can be restored instantly with a single click — they'll go right back where they were.
Purge the quarantine
Once you're confident that everything works without the quarantined files, delete the quarantine folder to permanently reclaim the disk space. This step is irreversible — only proceed when you're certain the files are no longer needed.
Why quarantine instead of delete?
Deleting files from disk is irreversible. Even when the scanner is confident a file is an orphan, edge cases exist — hardcoded URLs in page builders, external references from other sites, or files used by plugins that bypass the media library. The quarantine step gives you time to verify that nothing breaks, without the risk of permanent data loss.
Ready to take control of your media library?
StaticQ is free to use. Install it from WordPress.org and start cleaning up your media library today.
Get StaticQ