How to Find and Remove Orphan Files in WordPress
Step-by-step guide to safely finding and removing orphan files from your WordPress uploads folder using StaticQ Media — with quarantine, review, and restore.
Your WordPress uploads folder is almost certainly larger than it needs to be. Over the years, it accumulates files that don’t belong to any attachment in your media library — old thumbnails from deleted posts, failed upload fragments, leftover assets from plugins you deactivated years ago. These orphan files waste disk space, inflate your backups, and make migrations take longer than they should. But you can’t just delete everything that looks unfamiliar — that’s how you break things.
Here’s how to find WordPress orphan files in your uploads folder safely, review them before touching anything, and clean them up without risking your site.
Scope of this guide: this walkthrough assumes your media library lives on your server’s local disk — the standard WordPress setup. If you’ve previously offloaded your media to a cloud bucket (Cloudflare R2, AWS S3, etc.) via another plugin, the cleanup story has additional steps you should read first. See Finding Orphan Files After Migrating From Another Cloud Plugin instead.
What Are Orphan Files?
An orphan file is any file sitting in your wp-content/uploads/ directory that doesn’t have a corresponding attachment record in your WordPress database (wp_posts table with post_type = 'attachment').
WordPress tracks every image, document, and video you upload through the media library by creating an attachment post in the database. That attachment stores metadata — the file path, dimensions, thumbnail sizes, alt text. When WordPress needs to display or reference a file, it looks up this attachment record.
An orphan file has no such record. As far as WordPress is concerned, the file doesn’t exist. But it’s still taking up space on your server.
Why Orphan Files Accumulate
Even well-maintained WordPress sites accumulate orphan files over time. Common causes include:
- Deleted posts and pages: When you delete a post, WordPress doesn’t always delete every associated image — especially if the image was uploaded independently or shared across multiple posts.
- Theme changes: Your old theme registered custom image sizes (e.g.,
theme-hero-1200x600). When you switched themes, WordPress stopped generating those sizes for new uploads, but the old thumbnails remain on disk with no current purpose. - Plugin removals: Some plugins store assets in your uploads folder — slider images, form submission files, cached thumbnails. When you deactivate the plugin, the database records may be cleaned up, but the files often stay.
- Failed imports: If a migration or import process fails partway through, you can end up with files that were copied to disk before their database records were created.
- Manual FTP uploads: Files uploaded via FTP or file manager bypass WordPress entirely — they exist on disk but have no attachment record.
- Regenerated thumbnails: If you’ve ever used a “regenerate thumbnails” plugin, old sizes may linger on disk after new ones replace them.
On a site that’s been running for a few years, orphan files can easily account for 20-40% of your uploads folder.
Why You Can’t Just Delete Them
The temptation is to compare the database against the file system and delete everything that doesn’t match. This is dangerous for several reasons:
- Page builder assets: Elementor, Beaver Builder, and similar tools sometimes reference images by file path rather than attachment ID. Deleting the file breaks the reference, even though WordPress’s media library doesn’t know about it.
- Plugin storage: WooCommerce product downloads, BuddyPress avatars, and other plugins may store files in uploads subfolders. These files are legitimate, just not tracked as WordPress attachments.
- Hardcoded URLs: If someone pasted an image URL directly into a post’s HTML (instead of using the media library), that image has no attachment record. Deleting it breaks the post.
- Custom theme assets: Some themes dump images into uploads/ during activation. No attachment records, but the theme needs them.
The safe approach isn’t “scan and delete.” It’s scan, review, quarantine, test, and then purge.
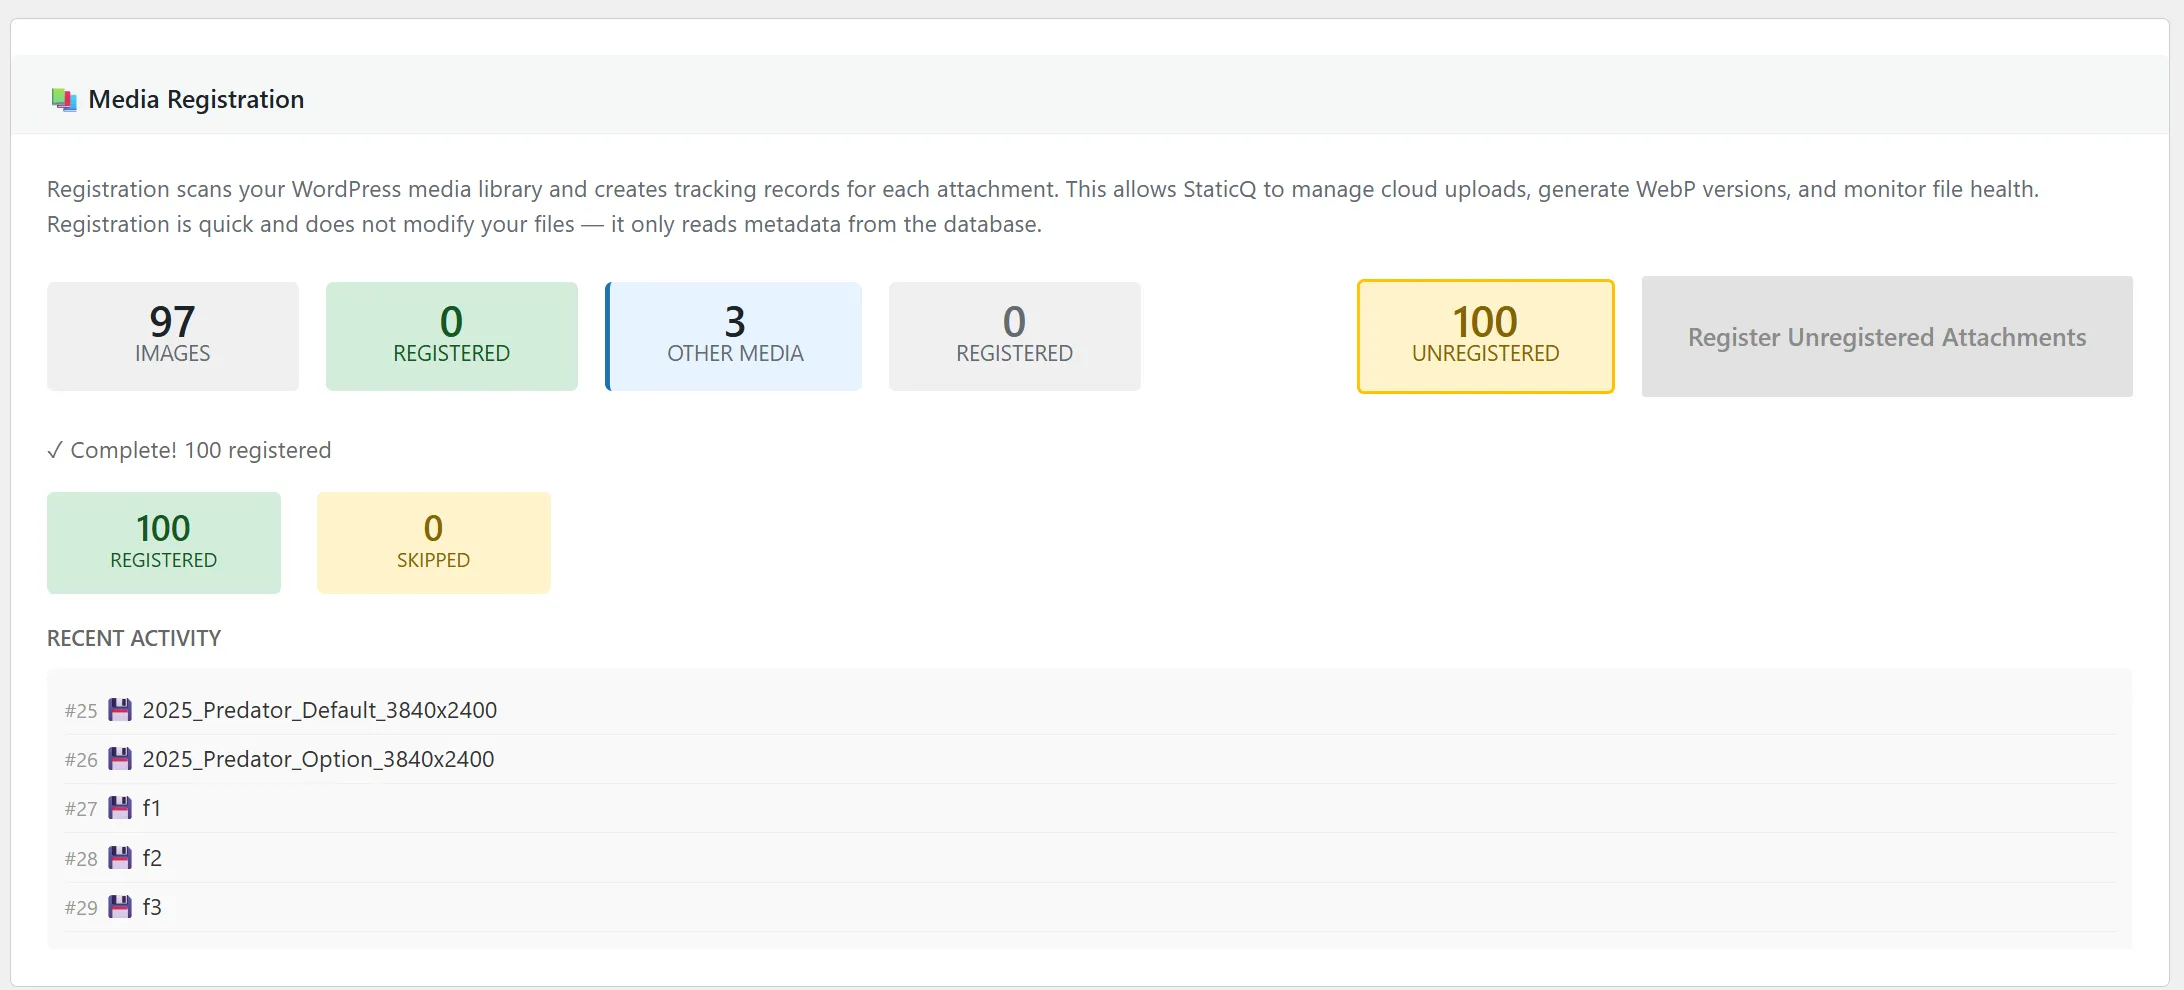
Step 1: Install StaticQ Media and Register Your Library
Go to Plugins > Add New, search for “StaticQ Media”, and activate it. You don’t need to configure cloud storage for this workflow — orphan detection works against your local uploads folder as-is.
Open StaticQ > Media Manager and click Register Unregistered Attachments. This creates tracking records for every attachment in your media library. Registration is read-only — it doesn’t modify or move any files. It just gives StaticQ the index it needs to tell the difference between legitimate attachments and potential orphans.
About WebP files: if your site previously used a plugin that generated
.webpvariants alongside your images, those.webpfiles will show up as orphans on this first scan. That’s expected — registration hasn’t verified they exist yet. The folder review step (Step 3) lets you see them grouped together so you can exclude them, and StaticQ’s Media Library Scanner can adopt them properly later if you want to keep them. Don’t quarantine them blindly.
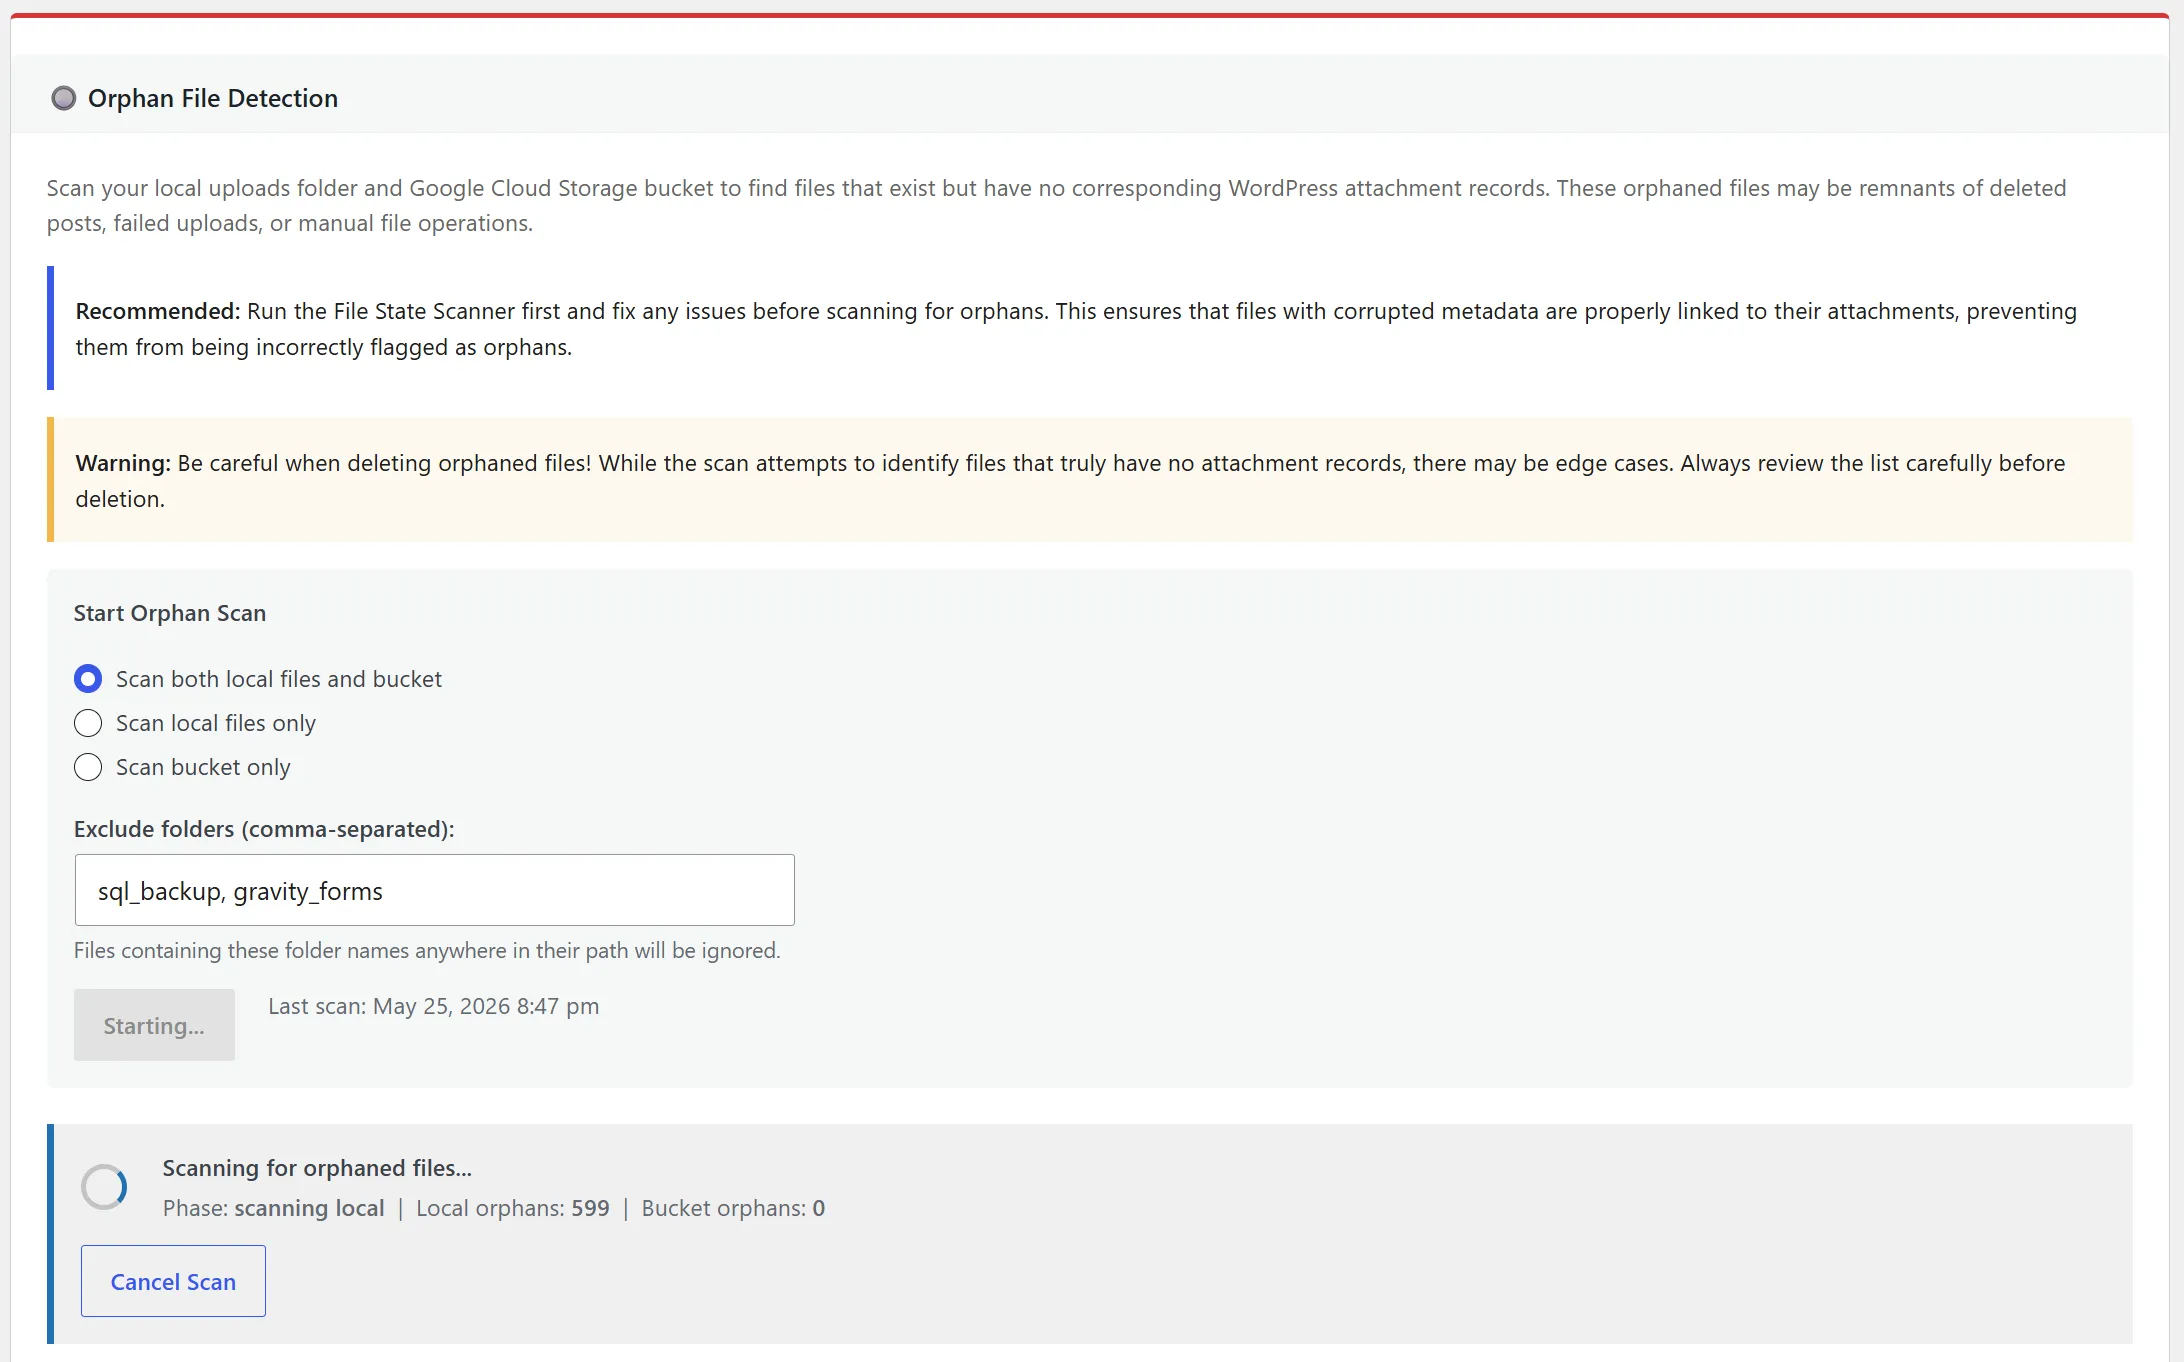
Step 2: Run Orphan Detection
Once registration is complete, click Scan for Orphans in the Media Manager. StaticQ walks your entire wp-content/uploads/ directory and compares every file against its index of known attachments and their associated thumbnails.
Files that don’t match any known attachment are flagged as orphans. The scan runs in batches to avoid timeouts on large libraries.
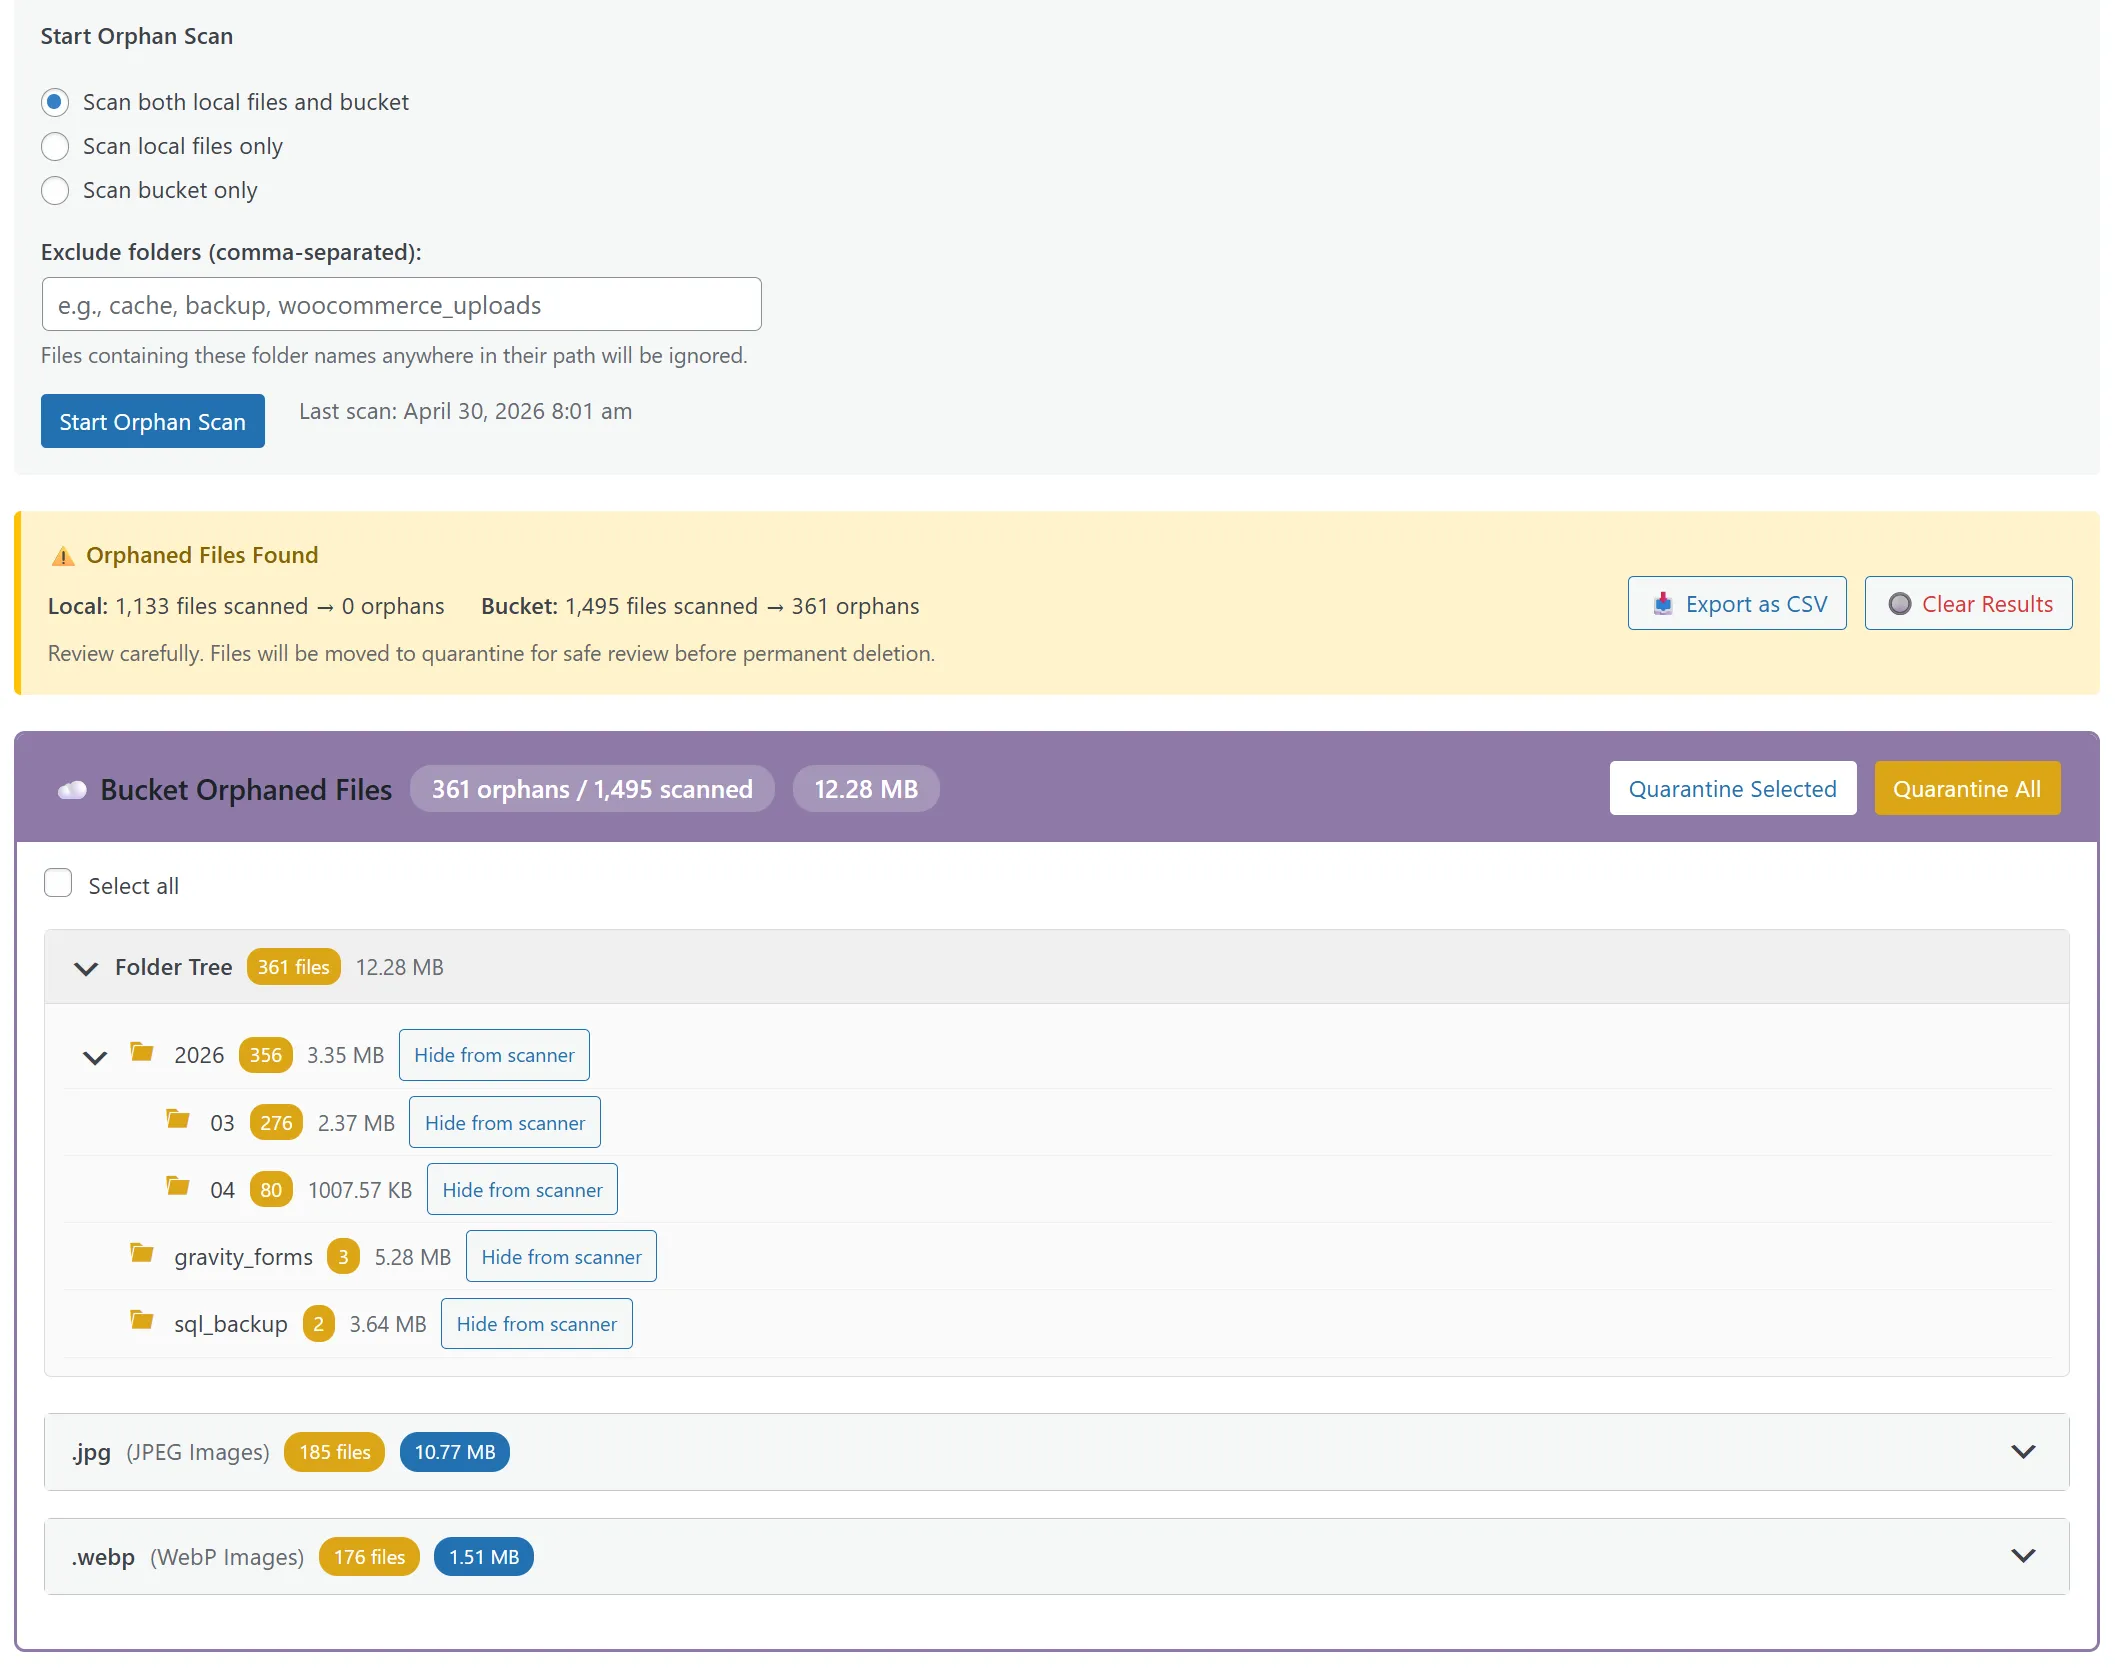
Step 3: Review the Folder Tree
When the scan finishes, StaticQ presents the orphan files organized by folder. This is where you look before touching anything.
Scan the folder names. You’ll likely see familiar patterns:
uploads/2023/04/— standard WordPress year/month folders. Orphans here are typically old thumbnails or deleted-post images.uploads/woocommerce_uploads/— WooCommerce file downloads. These are probably legitimate.uploads/elementor/— Elementor CSS and assets. Leave these alone.uploads/cache/— generated cache files from various plugins. Usually safe to remove, but check first.
The folder tree view lets you make informed decisions instead of guessing.
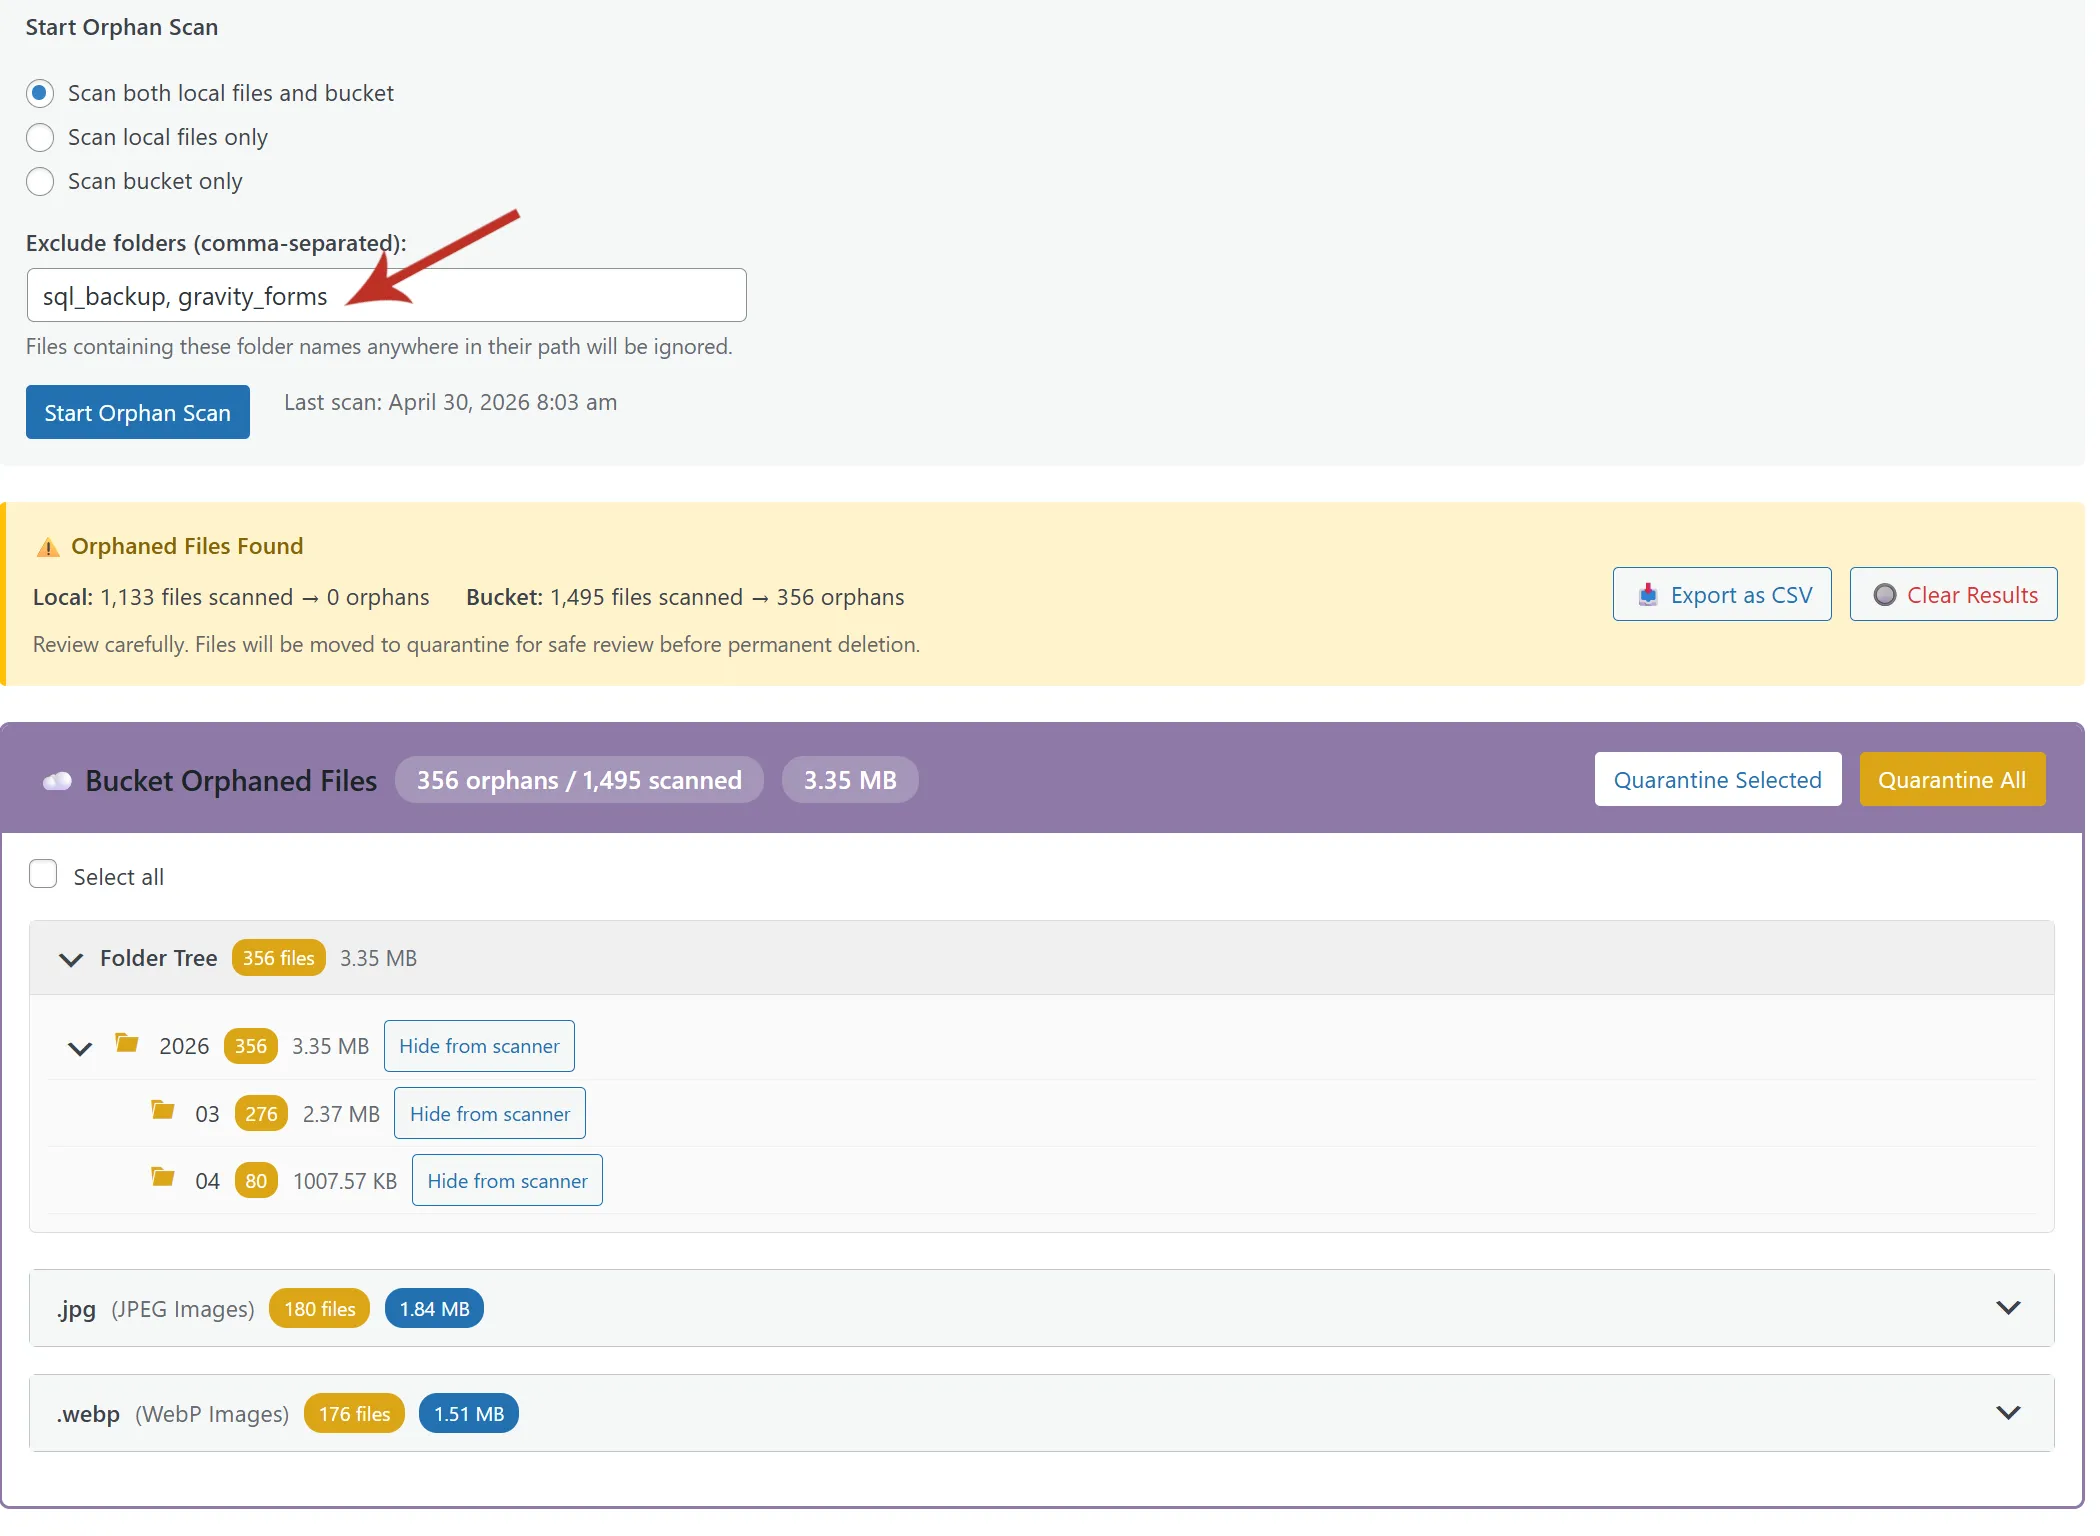
Step 4: Exclude Non-Media Folders
If you see folders that belong to plugins or themes — like elementor/, woocommerce_uploads/, buddypress/, or gravity_forms/ — exclude them. StaticQ lets you mark specific folders as excluded so their contents aren’t flagged as orphans.
This is the key step that prevents accidental damage. By excluding known plugin/theme folders, you narrow the orphan list to files that are genuinely unattached — not just files managed outside WordPress’s media library.
Step 5: Quarantine Orphan Files
With your exclusions set, select the orphan files you want to clean up and click Quarantine Selected (or Quarantine All if you’ve reviewed everything and are confident).
Quarantine does not delete files. It moves them to a separate quarantine directory where they’re no longer served by your site but can be restored instantly. Think of it as a recycle bin with a safety net.

Step 6: Test Your Site Thoroughly
After quarantining, browse your site. Check:
- Home page and key landing pages — do all images load?
- Recent posts — any broken images in the content?
- WooCommerce products (if applicable) — product images and galleries intact?
- Contact forms and downloads — any missing files?
- Custom page builder layouts — Elementor, Beaver Builder, WPBakery pages rendering correctly?
Open your browser’s DevTools and check the Console tab for 404 errors on image requests. If everything looks clean, the quarantined files were genuinely orphaned.
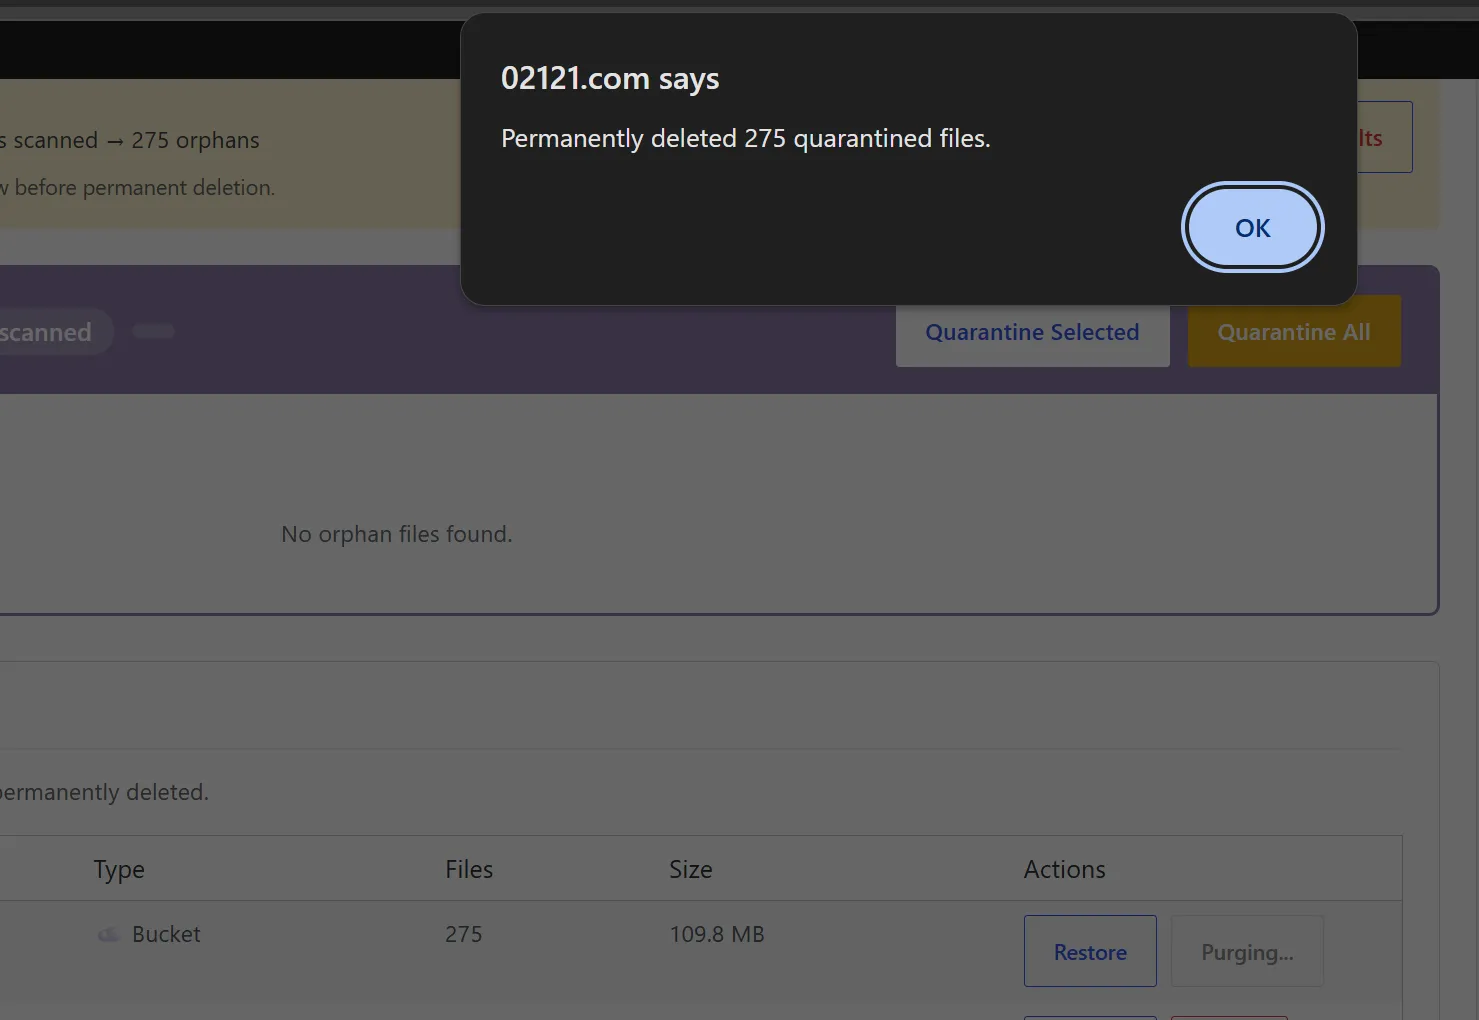
Step 7: Purge Quarantine When Confident
Once you’ve verified that nothing is broken — give it a few days if you want to be cautious — go back to the Media Manager and click Purge Quarantine. This permanently deletes the quarantined files and reclaims the disk space.
The amount of space recovered depends on your site’s history. A five-year-old blog with frequent theme changes might recover gigabytes. Even a newer site typically finds hundreds of megabytes of orphaned thumbnails and fragments.
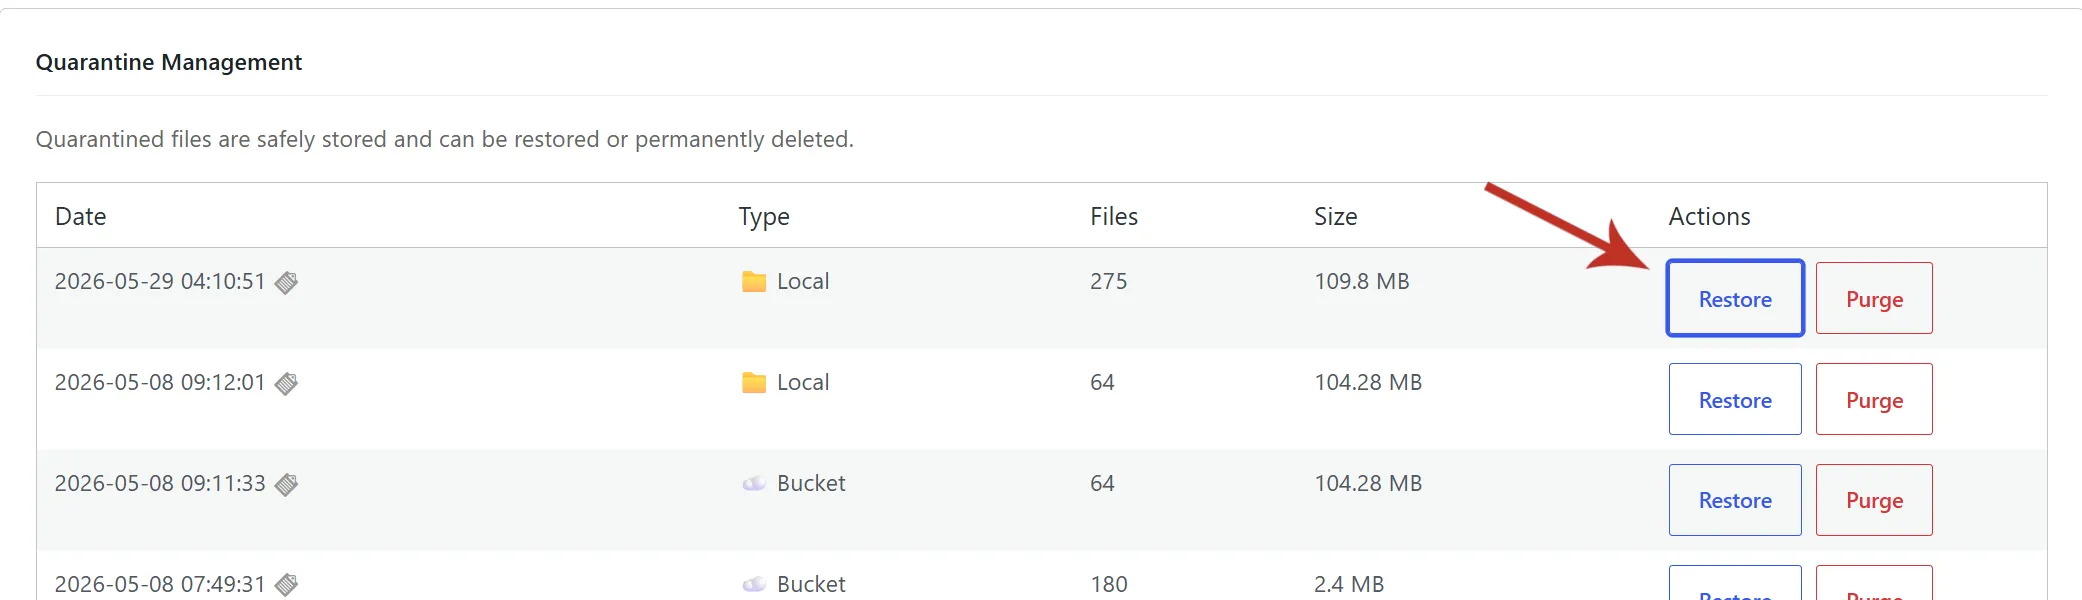
Bonus: Restore from Quarantine If Something Breaks
If you quarantine a batch of files and then discover a broken image or missing download, you don’t need to panic. Go to the quarantine view in Media Manager and restore the files you need. They’re moved back to their original location in uploads/, and your site picks them up again immediately.
This is why StaticQ uses a quarantine step instead of direct deletion. In a cleanup operation that might touch thousands of files, the ability to undo is not optional — it’s essential.
Keep Your Uploads Folder Clean
Orphan files are a maintenance problem, not a one-time fix. They’ll accumulate again as you delete posts, change themes, and remove plugins. Running Orphan Detection every few months keeps your uploads folder lean, your backups smaller, and your migrations faster.
Combined with StaticQ’s Media Library Scanner (for missing thumbnails and WebP variants) and Post Content Scanner (for stale URLs), you have a complete set of tools for keeping your WordPress media library healthy — without paying a monthly subscription to any optimization service.
What If My Files Are Already in a Cloud Bucket?
This guide covered the local-disk case. If you’re coming from another offload plugin (WP Offload Media, MediaCloud, etc.) and your files now live in a bucket, the orphan-detection story has more moving parts: how your previous plugin recorded file paths, whether StaticQ is pointed at the same bucket or a new one, and why the Media Library Scanner becomes essential as a first step. We cover all of that in Finding Orphan Files After Migrating From Another Cloud Plugin.